Now that you know how to work with soy wax, why not add it to other techniques, specifically ice dyeing? If you’ve never ice dyed, check out my very first tutorial on ice dyeing.
Ice dyeing is a bit different with soy wax because the fabric must be dry. The first step is to soda ash soak the fabric. In regular ice dyeing, that wet fabric would then be put on the dyeing rack ready for the ice. However, since the soy wax will dissolve in water, the fabric must be dry before you start this process.
After the fabric has been soaked in the soda ash water for 30 minutes, remove and hang to dry.
Once it is dry, you can lightly iron the fabric if it is too wrinkled for you.
Now get the soy wax out and play. Check out my soy wax tutorial.
In the picture below I’ve used one of my potato mashers and a brush to make marks with the wax on the dry fabric.
 Once the wax dries, which only takes a couple minutes, lightly scrunch it up and set on the screen inside of the dyeing pan.

 Add ice and then the dye. See these directions on ice dyeing HERE.
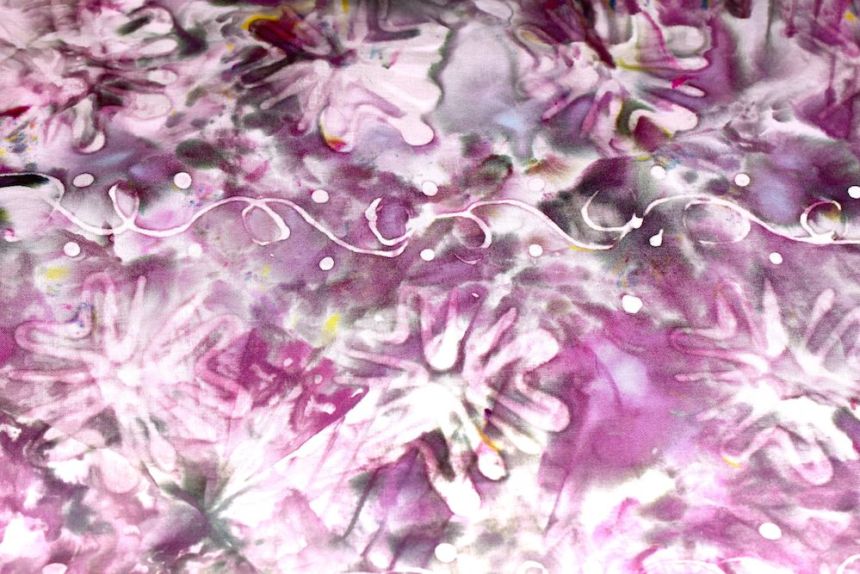
And here are the results.

On the left is fabric using a pure dye – Cerulean Blue. On the right I used Brushed Steel, a composite color which when ice dyed breaks out in all of its colors.
I’ve found I really like using composite colors instead of pure dyes with ice dyeing because of all of the color combinations. If we look at the Brushed Steel piece again, you can see all of the lovely colors including yellow. Also, looking closely you can see lines which are the screens that the piece sat on.
This is really one of my favorite ice dyeing pieces to date. I love all of the texture. The soy wax images are not crystal clear, but you can see them. I like the layers and it’s nice that it’s only two layers but looks like many more.
I wrote a post awhile back about Brushed Steel and how it breaks out and how it’s suppose to look like when low immersion dyeing. Check it out here.
So that’s just another way to use soy wax. It’s a fun medium and works great with ice dyeing. If you try this I’d love to see your results.
Discover more from Lynda Heines Fabric Design
Subscribe to get the latest posts sent to your email.
It turned out gorgeous!!! I just love it!!!
Lisa Chin recently posted..Fabric Printing at Home Blog Tour
Lisa, Thanks!
Lynda,
I will definitely give this a try soon… never thought of combining the two techniques, but I love your results! Thanks for sharing yet another great tutorial!
Judy, Thanks! It’s amazing the texture I got from this. As I said, that is my favorite of my ice dyeing. It looks like commercial fabric. Love to see what you do with it.
Ooh nice. Didy first ever shibori yesterday. So much fun. Xox
Hi Corrine, Thanks! I do love shibori. I bet it’s beautiful! I hope you post about it.
I love following your blog. You always have the best posts and info. Thank you for your info.
Denise, Thank you so much for your kind words. Made my day. Thank you for following my creative journey.
I love the shape of that potato masher. I think I need to start visiting the thrift stores and looking for some fun shapes.
terri stegmiller recently posted..BLOG HOP – Fabric Printing at Home
Terri, I love potato mashers. I’m always on the lookout for unusual ones wherever I go. I found that one on vacation in Asheville at a store. It’s a new one.
I’ve never done batik before (I’ve been meaning to though!), and you’ve inspired me to get off my butt and do it. I started snow dyeing last year, so am familiar with that half of the equation. Bought the soy wax today, and have ordered that same potato masher off Amazon. Sorry to be such a copycat, but I’ve also ordered the Brushed Steel dye from Dharma as I really love how it split for you. Planning to use the fabric I make in a skirt for my niece. Thanks for the inspiration and information!
GoGayleGo, What a great gift to me – to tell me that I inspired you. Awesome – made my day! Once you get started with the soy wax you might not be able to stop! And you can be a copycat. 🙂 Glad you ordered Brushed Steel. It’s so beautiful. I’d love for you to send me a picture of the skirt or even just the fabric when you get it done. Thanks for commenting.