
I have a new obsession – fabric badges.

I remember when I was a girl scout how much fun it was earning badges. Mom would sew them to the sash I’d wear proudly to the monthly meetings. I don’t have my sash, but somewhere in this house I have a sack of badges that didn’t get sewn on. I’ve looked all over in preparing this post, but no luck.
Anyway, after lots of experimenting, I mentioned on Facebook that I was having a hard time getting the satin-stitched edges perfect by just physically spinning the fabric at the machine. My friend Dawn posted that I could use her circle attachment. What a great idea! And then the light bulb came on. I remembered that I had purchased one several years ago and never even opened up the package.
You can use simply a tack and tape, or buy a fancy metal guide, but I bought this Nancy Zieman’s Circle Sew Simple and it works perfectly. I like that I can sew a variety of sizes of circles. The attachment is for whole number diameters (2 inches, 3 inches, 4 inches etc.). Since I wanted circles that were 2.5 inches in diameter I just attached the template 1/4 inch away from where it should go.

Instructions for setting up my attachment started with aligning the paper template with the needle. The needle needs to be in the center position.

Then if you are want whole number circle diameters, butt up the plastic attachment to that paper template. The kit includes double sided tape to place under the attachment so it stays in place. I didn’t butt up the plastic attachment to the paper template because I wanted 2.5 diameter circles. Be sure the plastic attachment is stuck to your table and machine. Mine is a bit wonky since my old Elna and my old sewing table aren’t quite at the same level, but it still works fine.
Next you add the plastic piece to the pin. In the picture I show the two different attachments you can put over the pin once you’ve attached the fabric. Remove the paper template before the next step.

Before adding the fabric, you need to add some type of stabilizer. For the badges I used Pellon SF101, and Pellon 808. Both work but are different weights. I like them both!
Add the prepared fabric to the pin. You will be putting a hole in the fabric, but you can cover that up with stitches when you are making your design. If you want your badge to be cut out of a specific area of your fabric, as I did with my marbling fabric, use a circle template to mark the center with a disappearing ink pin.

Then I put the pin through where I had marked.

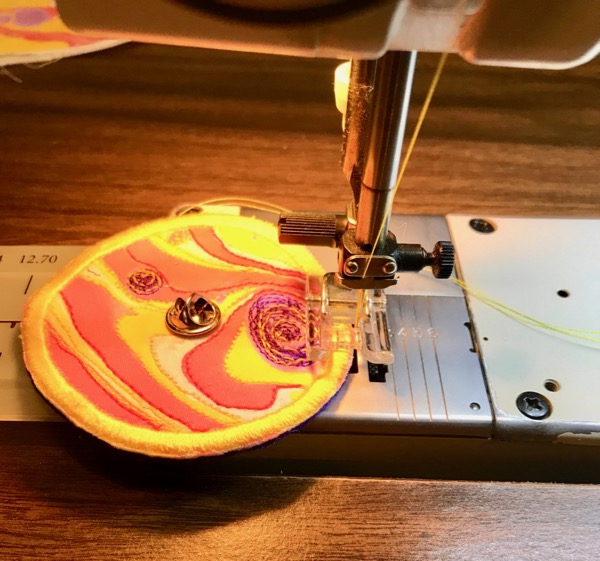
I set up my machine for a stitch width of 4 and length of a little over 1/2. You may want your edging wider or narrower.

Add one of the pin covers and start sewing. Here is a short video on the sewing process. If you are reading the blog via email, please come to the website in order to watch the video.
Once you have finished sewing, remove fabric from machine. Now is the time to decorate the badge. You can either hand sew or machine stitch to add your design. Here is one that I free motion stitched and then added more stitches.

Here I free motion stitched the design and then colored with markers.

With my marbled fabric badges, I just free motion stitched following the marbled pattern.

These were drawn and then stitched and painted.

(Another option is to create your design first before you stitch the edges. It’s all up to you and what works easiest and best.)
Once you have finished your design, apply fray check to the edges and let it dry.

Once it’s dry, cut carefully around the whole badge. Avoid cutting any of the stitches.

You can then take it back to the machine and stitch over again if you’d like.
This is what the badges look like on the back.

Now they can be hand or machine sewn or glued onto your clothing.

These can easily be made into brooches by adding a stiffer stabilizer, felt for backing, and a pin.
I do want to mention here that I’m still working on these badges. I still have more tweaking to go, but this is just a start to this new obsession! Thanks for dropping by.
Check out inspiration at Off The Wall Fridays Link Up.
Discover more from Lynda Heines Fabric Design
Subscribe to get the latest posts sent to your email.
These look like so much fun! I have my girl guide badges still too! Very happy memories of getting them.
Wouldn’t it be fun to give ourselves a badge for each task we master or achieve. We could then create a new sash or maybe a bag and show off our skills.
The video wouldn’t work for me so I will check back later to see it.
that circle tool idea is brilliant! another reason not to throw any tool away no matter how little you use it because one day it will be just what you need. the video didn’t attach to the post but a quick you tube search will bring you to a few demos. I never knew this tool existed.
i can see these badges being used in your classes for badges of surface design honor 🙂
Jo, I love your idea of a badge for certain tasks! The video is working now. Thanks for the heads up on that and dropping by.
Carol, I couldn’t believe I never used it. I bought it years ago when I was watching Nancy’s shows and loved the circles and never got around to using it. If it wasn’t for Dawn I would still be fighting the machine making those edges. The video is now working! Great idea for the badges!!! Love that!
This is a great idea. This year I’m the Coordinator for my local guild’s BOM. We have close to 50 participants and they are allowed, and encouraged, to join in at any time. I wanted to do something that would be significant to joining the adventure and this is looking very interesting. My thinking cap is getting tattered by all the ideas going on underneath it! LOL.
Thanks Lynda for sharing the method you followed.
Luann, Wow! That would be a great idea. I’m still working on these badges, but so far so good. Wish now I wouldn’t have sold my embroidery machine!
What a great tutorial on making fabric badges. You’ve inspired me. Your designs – spectacular!
Gwyned, Thank you! And so glad I inspired you. Thanks for dropping by.