
I’ve been sun printing for years, and my go-to paint has always been Setacolors Lights. I decided last week to experiment again, and do a comparison with it and Jacquard Dye-Na-Flow. You can check out my other sun printing posts here.

To tell you the truth, I really didn’t set out to do a comparison. I was having so much fun sun printing, ran out of my favorite Setacolors paint, so I went to my Dye-Na-Flow paint to play some more.
Here are comparisons. This one is with the Nandina leaves. If you want a color block look, use the Setacolors. Dye-Na-Flow colors were painted the same but all blended together.

This is with ornamental grass. I used a few different colors in the top one, but you can still see the comparison. Again you see lines versas blended colors.

These are using asparagus ferns. They really don’t show up real well in either piece, but I wanted you to see the colors.

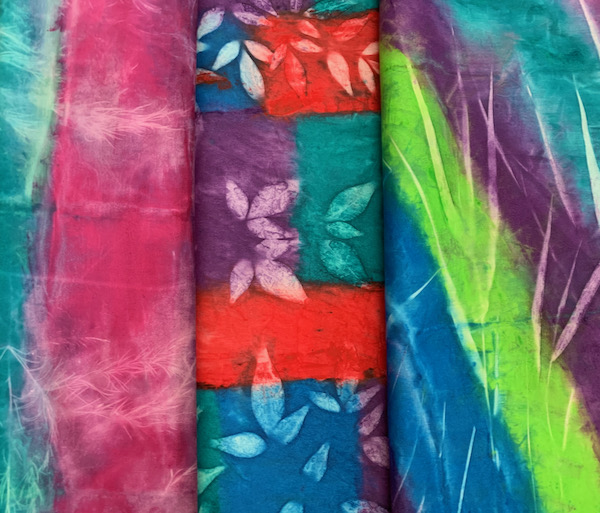
Lastly I sunprinted our ferns, but just in Dye-Na_Flow.

Just by looking at those photos you can see the difference. Dye-Na-Flow acts like a dye, with all of the colors blending. Setacolor acts like a paint and stays where you put it. In the first sample I was trying for a color block look. You can get it with Setacolor, not with Dye-Na-Flow. It depends on the look you are wanting.
Also the botanicals didn’t print as well with the Setacolors as the ones with Dye-Na-Flow. I printed on two different days. The Setacolor day was hot, humid and sunny. The Dye-Na-Flow day was hot, humid, and somewhat overcast. Not sure that made a difference in the printing, but if you’re not familiar with sun printing, it’s not about the sun. It’s about the heat and humidity.
Something different I did this time was use the paints full strength. I have always used them water downed. Since COVID I’ve been looking toward brighter colors, and decided I’d sun print them full strength. The results showed me that this is the way to sun print.
I’ve changed my technique over the years, and adding the paint full strength is just the newest improvement. If you’ve never sun printed, you are in for a treat. I’ll give you a fast tutorial here.
Since I like to work in the garage, I make a carrier sheet to take my fabric outside. The carrier sheet is a piece of cardboard (or anything sturdy) covered with a piece of plastic. I add clamps to keep the plastic on it. You could get fancy and duck tape the plastic to the back. I might do that next time!
Here is my carrier with plastic, my brushes, paint, plastic cups, and my dry fabric.

Soak the fabric in water. Wring it out, and place on the plastic. You don’t have to worry about wrinkles. They add texture. Then start painting. For this piece using the Setacolors I painted in stripes, but you can paint however you like. Just get the paint down. Also, you want the fabric to stay wet, so paint quickly.

Once you are finished, it’s time to quickly add the botanicals, stencils, or whatever you want to use as masks. I had already cut them from the yard before I started painting. I let the ferns and leaves soak in water while I’m painting. I shook the water off, and placed them on the painted fabric.

I use my hands to place the botanicals where I want them on the fabric. In this piece I rubbed the pieces down with my fingers. If they continue to be stubborn and not want to lay down, I take my paint brush with paint of that color or just water and pat them down.
Then I carry them to the sun.

Let them dry in the sun. Remove the masks, and then allow the fabric dry for a day before heat setting it with an iron. After you have heat set it you can wash if desired.
And that’s all there is to the process.
Have a great weekend, and as always, I appreciate you stopping by.
Discover more from Lynda Heines Fabric Design
Subscribe to get the latest posts sent to your email.
You make this process look like so much fun, Thank you for sharing. I like the Dye Na Flow is so much brighter.
Beautiful, Lynda! I’m sold that dye na flow would be my choice because I love the blend of colors. I might just have to try this again! It’s been quite awhile, but your results make me want to try it again! Thanks for the demo…
I love all of your tutorials and hope that you continue them. It seems as if lots of people aren’t blogging anymore. Sad–as it is a way to keep up with what everyone is doing.
I used to sun print with Setacolor but I never thought to try Dye-na-flo, so thanks for the idea!
Sherrie, You are welcome. I always used Setacolor but after this experiment, no more!
Janet, Thank you! I’ll keep doing them as long as I have something to blog about.
Judy, Me too. Love how dye-na-flow blends just like dyes. Yes, try it again!!
Jackie, It is so easy and so much fun! Yes, it’s much brighter and love how the colors blend.
Great post! I’ve been wanting to do some sunprinting, and I will if it ever stops raining here in Massachusetts. We’ve had rain eleven of the last twelve days. 🙁 I’ve resorted to spending time cleaning out my sewing room which has been long overdue.
Janice recently posted..Rain, Rain, Go Away
Janice, Thank you! Wow! We were so happy last week when we finally got rain after a long dry spell. Rainy days are good for cleaning. Glad you got something accomplished during those days. Hope you’ll be able to do some sun printing soon. Thanks for dropping by.
That is really cool. I would like to try with a silk scarf. How do you keep the fabric or leaves from blowing away. I live in Kansas and we have more windy days than calm.
Maria, Thanks. I’ve never tried it with silk, but I’m sure it would work. You can’t sun print on windy days. If you use something to hold down the leaves, there will be a mark on the fabric. Thanks for dropping by and commenting.
Me parece realmente mágico… Vivo en Argentina y aquí no se consiguen esas pinturas, crees que puede realizarse esta técnica con cualquier pintura para telas o sólo con estas funciona ?
Lili, I’m not sure how it would work with other paints. You could try other fabric paints but they need to be pretty watery.