
I’ve been reorganizing my studio and found deColourant Mist that I’ve never used. This product is like bleaching, but to me is much easier and not as toxic.

If you are interested in how this works, check out these previous posts where I used the deColourant gel. In this first blog post, I used it on some of my ice dyed fabric. This picture below shows text that I added to the piece using a thermofax screen and deColourant.

In this other post, I used it on my regular dyed fabric.

However, I had never used this mist, and never used this product, on commercially dyed fabric. Before I continue, since this product is removing color I recommend doing this in a well ventilated area. It’s not as bad as using bleach, but there is no reason to risk inhaling the vapors. This is even more important when you iron the fabric. At that time, again work in a ventilated area. I even wore my mask I use when I dye during the process.
While reorganizing I found all of this black fabric that Evi and I had bought for our “Colorful Friendship” exhibit back in 2014. This fabric was used as the backdrop in the 17 cases. Here is just part of the exhibit.

So, after the exhibit we split the fabric, and I was left with lots of black that I never used! So after finding the spray, I got out the fabric, some stencils, and played.
So let’s get started! I placed the fabric on my padded print board. Then I added a stencil and sprayed.

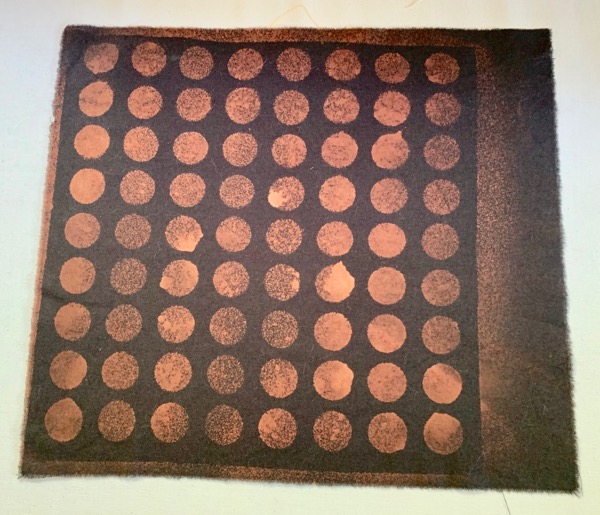
After spraying, I end up with a lot of product on top of the stencil. I like to use the stencil as a printing plate. I placed the sprayed side of the stencil down over a new piece of fabric and pressed. You can see where the mist is attaching to the fabric. I like this because it gives me another stenciled image.

On this next piece of fabric I used two stencils.

This time after spraying instead of moving the stencil, I place the new piece of fabric over the stencils. This is a much easier way to get that opposite image. I rub my hand over the fabric. You can see how the image is coming through to the back of the piece.

Now the fabric needs to dry. Once completely dry, take a dry iron to the fabric. I love watching the design appear. The more you iron it, the more of the color will come off and the image will be clearer. However, it never takes all of the color off the fabric. This picture shows that reverse image and shows the black fabric going to brown. But before making any judgments, we need to wash and iron the fabric.

Here they are, all ready to be cut up and used in a future project.
Here is the same stencil only using the sprayed side. I love all the texture.

Then the next set.

And the opposite with fabric placed on top of sprayed stencil.

I love all of these pieces, but think I like the reversed stencils best. I love using stencils as printing plates. You can see more about using stencils as printing plates with fabric spray paints in this post. Below is an example of the difference. If you’ve not tried this with your stencils, it really gives you a whole new set of designs. Some you might like and others not, but you never know until you try.

I’m linking up with Nina’s Off the Wall Friday. Check out some great inspiration there.
That’s all today. In the next post I’ll be showing you some fabric I hope to combine with these pieces. Have a colorful weekend.
Discover more from Lynda Heines Fabric Design
Subscribe to get the latest posts sent to your email.
This is awesome! I want to give this a try. What is the decolorant brand/name and where to buy. Thank you for the share! Claudia
Claudia, It’s Jacquard deColourant. I got it at Dharma Trading, but you probably can get it other places that sell dyeing supplies. It’s pretty amazing.
You have some great fabric there!
Angela, Thanks!
I didn’t know there was a decolourant mist product. I’ve only used the paste, and I can see the spray would be so much better to use with stencils (and yours are pretty awesome.) You got great results, especially with using the stencils as stamps.
Ooh, I have to try this! Thanks for sharing your projects using the product!
Joanna, Thanks. Yes, when I found out about it awhile ago I had to get it. And then I forgot I had it!! Just be sure and do it in a ventilated area since it’s even worse than the gel. Thanks for commenting.
Judy, Yes, you must!! Love to see what you would do with it.